The One System

Training Guide
Step 5: Creating a client record
The One app allows you to create a client, run some programs while that client is connected to the ONE amplifier, and then to schedule a single top-up device to maintain engagement with the selected program at a reduced intensity, supporting continuity between sessions. This simple approach will evolve in the future as we add more functionality to the software program.
At the moment the Run A Client session menu item down the left-side of the main window is where you need to create new clients. At some point in the future there will be a "Clients" menu item which will offer more functionality, so we have definite plans for doing more with the system than the current release.
When you click on the Run A Client session menu item you are presented with a page where you can either choose an existing client, or there is a button to create a new one.
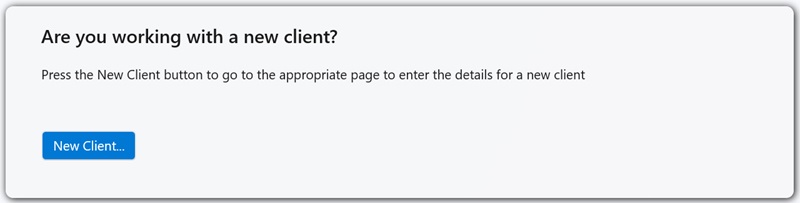
To be honest most of the input fields on this page are self-explanatory. Simply enter the name, address etc as you need to.
The text in the "Presenting Issue" is a simple reminder for the practitioner to see on the main session page for reference (e.g. gambling). This can be edited at any stage via the Client Details tab in the Session pages.
The only single item which is worth a moment to read here is the date of birth field. This uses the current Microsoft control for editing dates which is not quite as straightforward as it should be until you have done it one time so it is explained here (and again on the Client Details page of this website). To change the date value you click anywhere on the control, this action will expand the control into an edit mode of it's own.
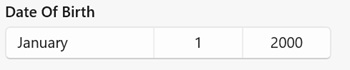
1. Date picker is in a closed state
When you click anywhere on this date picker then the control opens out into a full editing experience.
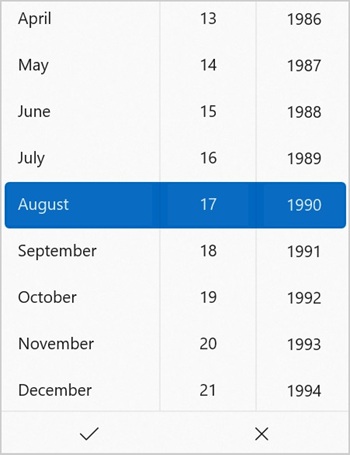
2. Date picker is in a open (editable) state
Note in the month column that November is currently selected. In this same column there is an up-arrow above the word [August], and a down-arrow beneath the word [February]. These up/down controls give you the ability to scroll the list of months up and down until you can see the month that you want to choose. Once you can see the month then click it and it will reposition itself to indicate that it is selected. Perform similar actions for the day and year values.
Important: Once you have selected the date then be sure to click on the "tick" at the bottom of the date picker. This will confirm your value and close the control. Clicking away from the control or pressing the X will also close it but it won't apply the new value that you just set.

Note the tick and cross icons at the bottom of the date editor. If you don't press the tick then the new date value will not be applied. This is the important bit that I wanted you to see. People sometimes miss this and then wonder why the date value wasn't set (me too on a couple of occasions).
After you have entered the client data you press either of the "Create" buttons at the bottom of the page. One option will take you into the session page, while the other will return you to the desktop.
If you are following the 7-step guide then you should now move on to Step 6 - Run a connected session